- IMU(iAHRS) 와 RPLidar 정상동작 확인
- 각 센서들이 특정 usb 케이블 연결시에만 동작함을 확인. 해당 케이블들이 센서에 맞는 전력을 공급해서라고 추정
- RPLidar Launch File 확인 후 kusmo_bot.launch file에 대입
- IMU(iAHRS) Sensor
- 아래 post를 따라 iAHRS의 ROS package 설치
https://youngseong.tistory.com/100
[RIS] 11/1
아래 github의 package를 통해 ROS Noetic에서 iAHRS IMU 센서를 구동시킴 https://github.com/wookbin/iahrs_driver GitHub - wookbin/iahrs_driver: iahrs ros package iahrs ros package. Contribute to wookbin/iahrs_driver development by creating an a
youngseong.tistory.com
- 설치 후 , kusmo_bot.launch file에 IMU node에 해당하는 부분 작성
<!-- IMU Data Publisher Using the IAHRS IMU Sensor -->
   <param name="m_bSingle_TF_option" type="bool" value="true" /> <!--false-->
  <node pkg="iahrs_driver" type="iahrs_driver" name="iahrs_driver" output="screen" />
- Encoder의 tick data를 Arduino를 통해 받아옴
* Raspberry Pi에 Arduino 설치 후 Arduino와 Serial 연결 후 아래 과정 다시 진행할 계획. 우선은 노트북에 Arduino를 Serial 연결하여 진행
- Integrate Arduino With ROS
$ sudo apt-get install ros-noetic-rosserial-arduino
$ sudo apt-get install ros-noetic-rosserial- rosserial에 필요한 package들 설치
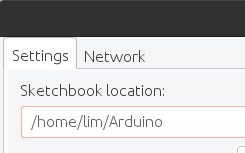
- Arduino IDE에서 Sketchbook`s location 확인
$ cd Arduino/libraries
$ rm -rf ros_lib- 해당 directory로 이동 후 ros_lib 제거
$ rosrun rosserial_arduino make_libraries.py .- ROS에서 사용될 Arduino Library build
- 위 명령어 입력시 libraries directory에 ros_ilb가 생성됨

-ROS를 이용해 Arduino에서 Blink 예제 실행
- File -> Examples -> ros_lib 의 Blink sketch open
- 원래는 아두이노와 라즈베리파이 연결 후 진행해야 하나 우선 노트북과 Arduino 연결 후 진행
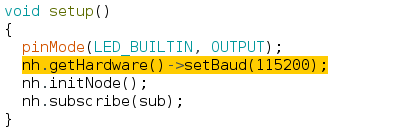
- baud rate 변경을 위해 nh.initNode(); line 위에 아래 코드 입력
- nh.getHardware()->setBaud(115200);
- baud rate는 기본적으로 57600로 설정되어 있음
- 위의 코드를 입력하거나 launch file을 수정하여 baud rate 변경 가능
$ roscore- Master node 실행
$ cd ~/catkin_ws
$ rosrun rosserial_python serial_node.py _port:=/dev/ttyACM0 _baud:=115200- catkin_ws directory로 이동 후 ROS serial server launch
$ rostopic pub toggle_led std_msgs/Empty --once- 빈 message 하나를 /toggle_led topic에 publish하여 LED를 켬
- 위 명령어를 다시 실행하면 LED가 꺼짐
$ rostopic list- 활성화된 topic들 확인

- Tick Publisher 생성 전 아래 post 확인
- https://automaticaddison.com/how-to-calculate-the-velocity-of-a-dc-motor-with-encoder/
https://automaticaddison.com/how-to-publish-lidar-data-using-a-ros-launch-file/
How to Publish LIDAR Data Using a ROS Launch File – Automatic Addison
In this tutorial, I will show you how to publish LIDAR data using a ROS launch file. Real-World Applications This project has a number of real-world applications: Indoor Delivery RobotsRoom Service RobotsMapping of Underground Mines, Caves, and Hard-to-R
automaticaddison.com
https://automaticaddison.com/how-to-publish-imu-data-using-ros-and-the-bno055-imu-sensor/
How to Publish IMU Data Using ROS and the BNO055 IMU Sensor – Automatic Addison
In this tutorial, I will show you how to use the BNO055 sensor (using i2c communication) to generate IMU data for a ROS-based robot. I actually prefer the BNO055 over other IMU sensors like the MPU6050. I have found that the BNO055 generates more accurat
automaticaddison.com
https://automaticaddison.com/calculate-pulses-per-revolution-for-a-dc-motor-with-encoder/
Calculate Pulses per Revolution for a DC Motor With Encoder – Automatic Addison
In this tutorial, we will learn how to calculate the number of pulses per 360 degree revolution for a DC motor with a built-in encoder. The motor that we will work with looks like the following image, however you can use any motor that looks similar to it:
automaticaddison.com
https://automaticaddison.com/how-to-publish-wheel-encoder-tick-data-using-ros-and-arduino/
How to Publish Wheel Encoder Tick Data Using ROS and Arduino – Automatic Addison
In this tutorial, we will create a program using ROS and Arduino to publish the tick data from the encoders of each motor of a two-wheeled robot. The microcontroller we will use is the Nvidia Jetson Nano, but you can also use an Ubuntu-enabled Raspberry
automaticaddison.com
- To do tomorrow :
Install Arduino on Raspaberry Pi
'Project > KUSMO' 카테고리의 다른 글
| [KUSMO] 11/20 (Raspberry Pi WiFi, Platform IO) (1) | 2022.11.20 |
|---|---|
| [KUSMO] 11/19 (Motor Encoder Data Publisher) (0) | 2022.11.19 |
| [KUSMO] 11/4 (Navigation Stack 구성법) (0) | 2022.11.04 |
| [KUSMO] 11/3 (rosserial) (2) | 2022.11.04 |
| [KUSMO] 10/31 (진행 상황 정리) (0) | 2022.11.01 |


